Crochet Rochelle: 2013

Sunday, November 3, 2013

Pretty Girl Beanie


Hey Crochet Rockers!

I love a great beanie. And really, who doesn’t? For me a great beanie is easy to crochet, versatile and wearable. Since I have two active little boys and an outdoorsy husband, we go through the beanies like crazy. But I don’t often get the chance to make pretty beanies since I am the only girl in the house – and we crocheters seldom make stuff for ourselves. Am I right?

After I posted the Pretty Baby Beanie, I received lots of positive feedback and plenty of oohs and ahhs on Facebook and a few on Ravelry too! Upon special request from a child hood friend who saw the baby version on Facebook, I created a larger version of the original pattern with instructions for making sizes 6 months to Adult!  I also included two alternate ways to finish off the band and scallop edging of the beanie. The 1st one creates a looser fit and larger scallops. The 2nd version creates a tighter fit and smaller scallops – both are easy and adorable!


(I also made her one too and sent it off to its new beanie home. A SHOUT-OUT to my friend Rachelle N. for the request and inspiration!)

Here’s my version of a simple beanie that is easy to crochet and so pretty to wear or share! I hope you enjoy it. As always, should you have any questions about this pattern (or find any errors) – please email me, message me on Ravelry or comment on this post.

If you like this beanie, you can find the Pretty Baby Beanie here. It's for size 0 - 3 months.


Add this pattern to your Ravelry Queue.

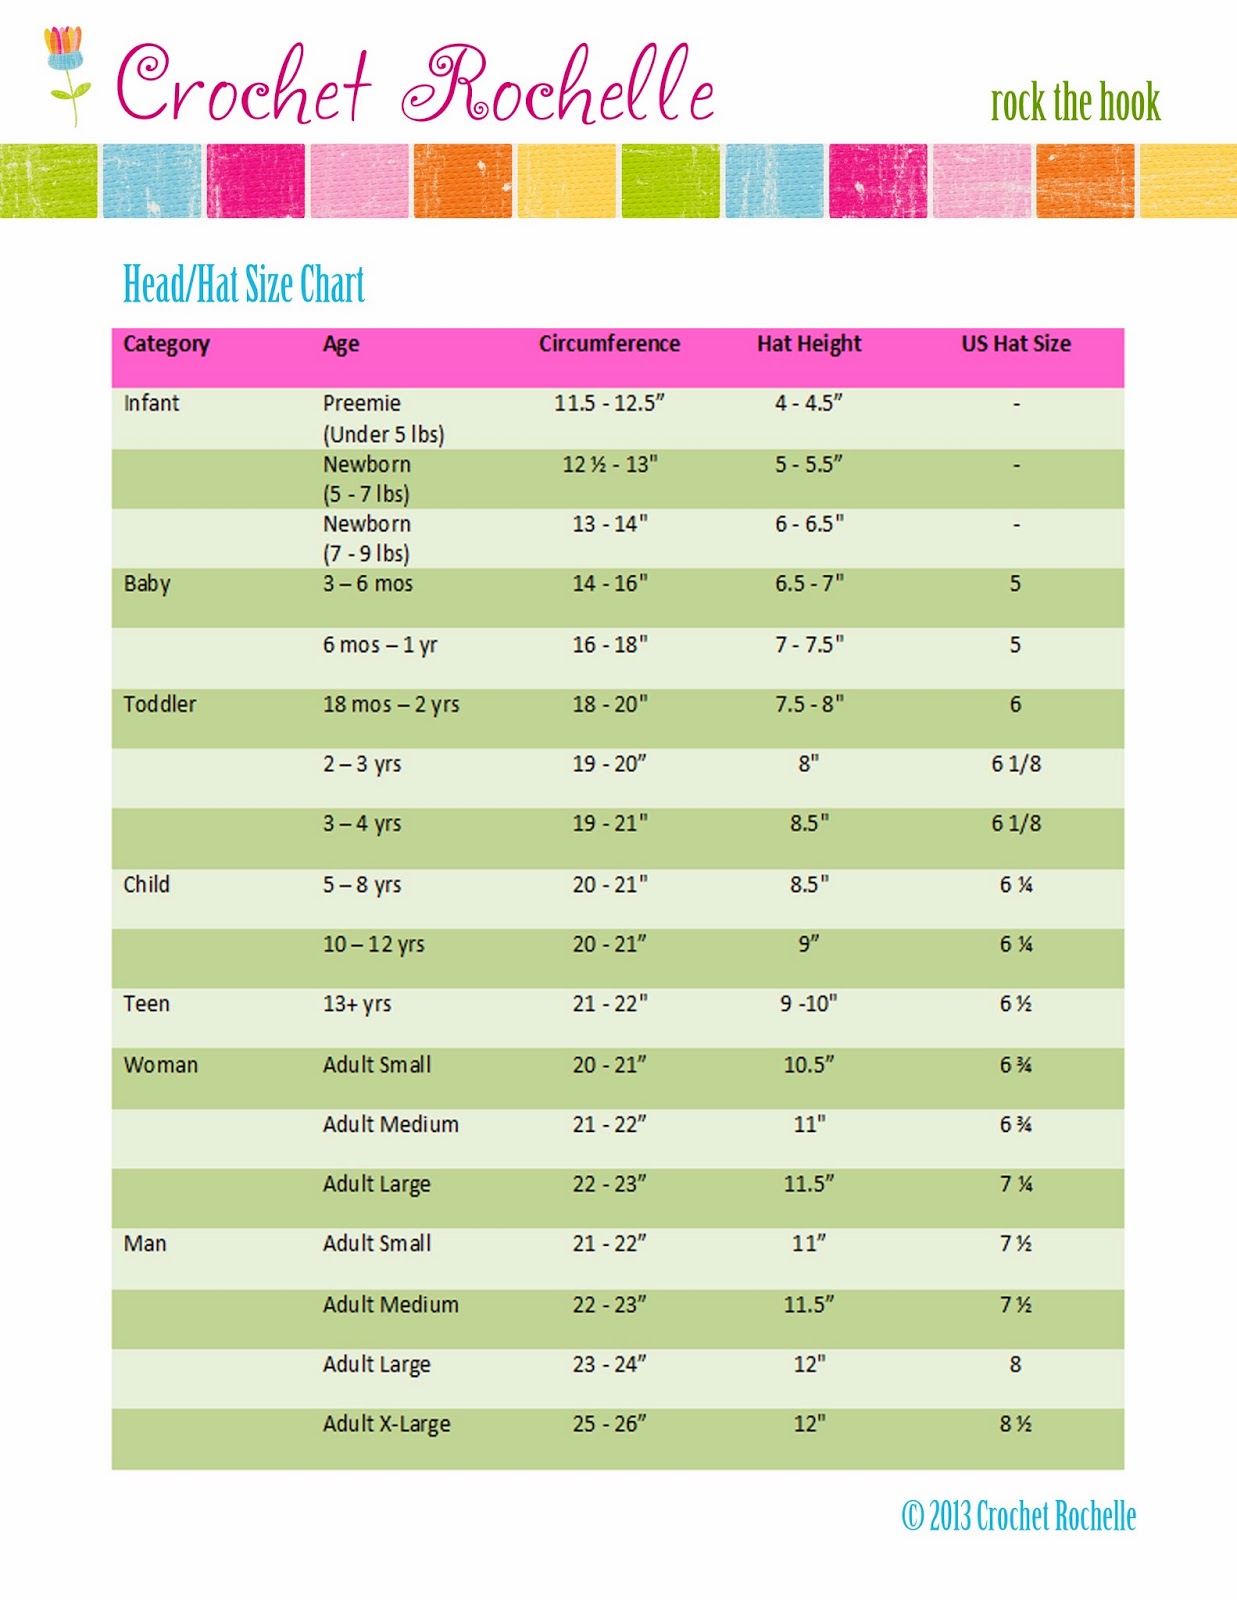
Size: 6 months to Adult

Skill Level: Easy

Materials:
Caron Simply Soft yarn (any two colors) or Red Heart Soft (any two colors)
Yarn/tapestry needle
Hook size: H/5.00mm
(If you use Red Heart, you may want to change to an I/5.50mm hook.)

Key:
CC = change color
CH = chain
SC = single crochet
HDC = half double crochet
DC = double crochet
JOIN = slip stitch to first st of round
Magic Ring = tutorial here

RND = round
SL ST = slip stitch
SK = skip

Gauge:
5 DC = 1" (length)
2 Rows = 1" (height)

Notes:
Chains do not count as stitches in this pattern.
Join your round to the first DC, not your chain.
Start your first stitch of each round in the same space as your chain/s.
If your beanie is too short, add a few extra rows of “dc around” to add height. (ex: Rnd 6 in 6 mos. pattern)


Instructions:

6 months
Rnd 1: Magic Ring, dc 10, join.
Rnd 2: Ch2, 2 dc in each stitch around, join. (20 DC)
Rnd 3: Ch2, [2 dc in next stitch, dc 1], repeat around, join. (30 DC)
Rnd 4: Ch2, [2 dc in next stitch, dc 2], repeat around, join. (40 DC)
Rnd 5: Ch2, [2 dc in next stitch, dc 3], repeat around, join. (50 DC)
Rnd 6: Ch 2, dc around, join. (50 DC)
Rnd 7 – 8: Repeat Rnd 6.
Proceed to desired finish version.

12 months – 2T
Rnd 1: Magic Ring, dc 10, join.
Rnd 2: Ch2, 2 dc in each stitch around, join. (20 DC)
Rnd 3: Ch2, [2 dc in next stitch, dc 1], repeat around, join. (30 DC)
Rnd 4: Ch2, [2 dc in next stitch, dc 2], repeat around, join. (40 DC)
Rnd 5: Ch2, [2 dc in next stitch, dc 3], repeat around, join. (50 DC)
Rnd 6: Ch2, [2 dc in next stitch, dc 9], repeat around, join. (55 DC)
Rnd 7: Ch 2, dc around, join. (55 DC)
Rnd 8 – 9: Repeat Rnd 7.
Proceed to desired finish version.

Toddler – Preschool (3T – 4T)
Rnd 1: Magic Ring, dc 10, join.
Rnd 2: Ch2, 2 dc in each stitch around, join. (20 DC)
Rnd 3: Ch2, [2 dc in next stitch, dc 1], repeat around, join. (30 DC)
Rnd 4: Ch2, [2 dc in next stitch, dc 2], repeat around, join. (40 DC)
Rnd 5: Ch2, [2 dc in next stitch, dc 3], repeat around, join. (50 DC)
Rnd 6: Ch2, [2 dc in next stitch, dc 4], repeat around, join. (60 DC)
Rnd 7: Ch 2, dc around, join. (60 DC)
Rnd 8 – 10: Repeat Rnd 7.
Proceed to desired finish version.

Child
Rnd 1: Magic Ring, dc 10, join.
Rnd 2: Ch2, 2 dc in each stitch around, join. (20 DC)
Rnd 3: Ch2, [2 dc in next stitch, dc 1], repeat around, join. (30 DC)
Rnd 4: Ch2, [2 dc in next stitch, dc 2], repeat around, join. (40 DC)
Rnd 5: Ch2, [2 dc in next stitch, dc 3], repeat around, join. (50 DC)
Rnd 6: Ch2, [2 dc in next stitch, dc 4], repeat around, join. (60 DC)
Rnd 7: Ch2, [2 dc in next stitch, dc 11], repeat around, join. (65 DC)
Rnd 8: Ch 2, dc around, join. (65 DC)
Rnd 9 – 12: Repeat Rnd 8.
Proceed to desired finish version.

Teen (Small Adult)
Rnd 1: Magic Ring, dc 10, join.
Rnd 2: Ch2, 2 dc in each stitch around, join. (20 DC)
Rnd 3: Ch2, [2 dc in next stitch, dc 1], repeat around, join. (30 DC)
Rnd 4: Ch2, [2 dc in next stitch, dc 2], repeat around, join. (40 DC)
Rnd 5: Ch2, [2 dc in next stitch, dc 3], repeat around, join. (50 DC)
Rnd 6: Ch2, [2 dc in next stitch, dc 4], repeat around, join. (60 DC)
Rnd 7: Ch2, [2 dc in next stitch, dc 5], repeat around, join. (70 DC)
Rnd 8: Ch 2, dc around, join. (70 DC)
Rnd 9 – 13: Repeat Rnd 8.
Proceed to desired finish version.

Adult (Medium Adult)
Rnd 1: Magic Ring, dc 10, join.
Rnd 2: Ch2, 2 dc in each stitch around, join. (20 DC)
Rnd 3: Ch2, [2 dc in next stitch, dc 1], repeat around, join. (30 DC)
Rnd 4: Ch2, [2 dc in next stitch, dc 2], repeat around, join. (40 DC)
Rnd 5: Ch2, [2 dc in next stitch, dc 3], repeat around, join. (50 DC)
Rnd 6: Ch2, [2 dc in next stitch, dc 4], repeat around, join. (60 DC)
Rnd 7: Ch2, [2 dc in next stitch, dc 5], repeat around, join. (70 DC)
Rnd 8: Ch2, [2 dc in next stitch, dc 13], repeat around, join. (75 DC)
Rnd 9: Ch 2, dc around, join. (75 DC)
Rnd 10 – 14: Repeat Rnd 9.
Proceed to desired finish version.

Adult (Large/X-Large)
Rnd 1: Magic Ring, dc 10, join.
Rnd 2: Ch2, 2 dc in each stitch around, join. (20 DC)
Rnd 3: Ch2, [2 dc in next stitch, dc 1], repeat around, join. (30 DC)
Rnd 4: Ch2, [2 dc in next stitch, dc 2], repeat around, join. (40 DC)
Rnd 5: Ch2, [2 dc in next stitch, dc 3], repeat around, join. (50 DC)
Rnd 6: Ch2, [2 dc in next stitch, dc 4], repeat around, join. (60 DC)
Rnd 7: Ch2, [2 dc in next stitch, dc 5], repeat around, join. (70 DC)
Rnd 8: Ch2, [2 dc in next stitch, dc 6], repeat around, join. (80 DC)
Rnd 9: Ch 2, dc around, join. (80 DC)
Rnd 10 – 15: Repeat Rnd 9.
Proceed to desired finish version.


 Version 1:
This version creates a looser band fit around the forehead and a larger scallop.
CC = alternate color
3 Rnds of: Ch 2, HDC around, join.
CC = primary color
1 Rnd of: Ch 1, skip next 2 sts, 7 DC in next st, skip next 2 sts, [sl st in next, skip 2, 7 DC in next, skip 2] repeat around. SC in last sp, join.
Finish, weave ends.


Version 2:
This version creates a tighter band fit around the forehead and a smaller scallop.
CC = alternate color
4 Rnds of: Ch 1, SC around, join.
CC = primary color
1 Rnd of: Ch 1, skip next st, 5 DC in next st, skip next st, [sl st in next, skip 1, 5 DC in next, skip 1] repeat around. SC in last sp, join.
Finish, weave ends.

 
Optional Embellishment:

I crocheted flowers to add to my beanies using the following free pattern:
Crocodile Stitch Flower, Free Pattern from B.hooked Crochet

You could also use buttons, silk flowers, fabric flowers, ribbons or other fun accents to adorn this sweet beanie. Be creative!

And here I am modeling the Pretty Girl Beanie!


Rock the hook.

xx

Don't forget to rock with me over at Facebook, Pinterest and on Ravelry.

Friday, October 18, 2013

Head Size Chart

Hey Rockers,

If you've been following the blog you know my last few patterns have been hats. While I was working on my Pretty Baby Beanie and Strawberry Slouchy (and a few other patterns I'll be adding soon) I looked around the Internet for a clear head & hat size chart so I would know the average sized head for each age, baby through adult. I was stumped. I found a few good ones, but no one chart had everything I wanted all in one place, in an easy organized sheet.

I took matters into my own hands and decided to create my own version to use as a reference chart and thought you might like one too - I am all about sharing!

Here is my head size chart. (This is based on averages. Always measure for size if possible...especially little kids. I can't tell you how many times I've made a special order hat for someone's baby or toddler and ended up having to make a duplicate because the first one didn't fit. Bogus.)


I like having my charts close at hand and I keep a copy in my crochet bag too. I've included a pdf version below for easy access. (Did you know you can add pdf docs to Evernote and other readers for your tablets or iPads?)

Here is the PDF version.

You can find my Foot Size Chart and Hand Size Chart here. 

Rock the hook.
xx

Don't forget to rock with me over at Facebook, Pinterest and on Ravelry.

Wednesday, October 9, 2013

I Love Yarn Day


Hey Rock Stars,

So, there's this holiday called I Love Yarn Day...yes, it's a real thing. Seriously. I don't really know much about it, cuz I still consider myself a newbie among crochet bloggers. I know you can participate. I don't know who the I Love Yarn Day people are. I probably should.

I know I love yarn. It helps me not want to hurt people.


Anyway, there's this Craft Yarn Council. They must be pretty popular because I can't get their website to load myself. But if you happen to get past the internet gatekeeper, I'm sure it'll be a pleasant experience. Also, I'm told they have free patterns to browse as well as other swaggy artwork and I Love Yarn Day paraphernalia. If they are anything like the Parks and Rec city council, I'm not sure we can be friends. (I love Leslie Knope too much.) But I'll give them a go.


I Love Yarn Day has it's own Facebook page. They (the yarn council) encourage people to show yarn love by throwing parties, knitting or crocheting in public, supporting local yarn stores (LYS), yarn-bombing and other crazy fiber-themed activities.


So the details are still a little vague for me. What's with I Love Yarn Day? Is it more like Mardi Gras with beads, topless knitters and crochet Jello shots? Or more reserved like Thanksgiving dinner where we all take turns saying which yarn company we are most grateful for and say a blessing for the bounty of sheep?

This year I Love Yarn Day is celebrated Friday, October 11. All day. Let the fiber fiestas commence.  

Rock the hook,
xx

Don't forget to rock with me over at Facebook, Pinterest and on Ravelry.

Friday, October 4, 2013

Blueberry Beanie

 
Blueberry Beanie with optional Earflaps

It’s October! And you know what that means? Pumpkins…and blueberries! (Well, sort of.) I designed this hat for my sweet friend as part of her middle daughter’s Halloween costume. (Shout out to Brooke & Ava for the inspiration!) This hat will fit most preschoolers and elementary age kids.

There are tons of free patterns on the internet for beanie hats. I love this beanie pattern because it’s simple and can be adapted for character hats or other themed hats (such as grapes, apples or even pumpkins). You can crochet this beanie with or without the earflaps - it's adorable either way!


Add this pattern to your Ravelry Queue.

Size: Preschool/Child

Skill Level: Easy

Materials:
Worsted weight yarn
Yarn/tapestry needle

Hook size: I/5.50mm

Key:
CH = chain
SC = single crochet
DC = double crochet
SL ST = slip stitch
JOIN = use a slip stitch to join to first stitch in round
CC = change color
RND = round

Gauge:
4 DC = 1" (length)
2 Rows = 1" (height)

Notes:
Start your first stitch of each round in the same space as your chain.
Join your round to the first HDC, not your chain.
Chains do not count as stitches in this pattern.


Instructions:
CC = Blue.
Rnd 1: Magic Ring, Chain 2, 10 DC in magic ring, join to first DC, ch 2
Rnd 2: 2 DC in each around, join to first DC. (20 DC)
Rnd 3: Ch 2, 2 DC in first stitch, DC in next, repeat around, join. (30 DC)
Rnd 4: Ch 2, 2 DC in first stitch, DC in next 2, repeat around, join. (40 DC)
Rnd 5: Ch 2, 2 DC in first stitch, DC in next 3, repeat around, join. (50 DC)
Rnd 6: Ch 2, 2 DC in first stitch, DC in next 4, repeat around, join. (60 DC)
Rnd 7: Ch 2, 2 DC in first stitch, DC in next 11, repeat around, join. (65 DC)
Rnd 8 – 14: Ch 2, DC in each stitch around, join.
Finish, weave ends for plain beanie.


Earflaps:
(Continue from Rnd 14)
Row 1: Ch 2, dc 12, turn. (12 DC)
Row 2: Ch 2, dc2tog, dc 8, dc2tog, turn. (10 DC)
Row 3: Ch 2, dc2tog, dc 6, dc2tog, turn. (8 DC)
Row 4: Ch 2, dc2tog, dc 4, dc2tog, turn. (6 DC)
Row 5: Ch 2, dc2tog, dc 2, dc2tog, turn. (4 DC)
Row 6: Ch 2, dc2tog twice. (2 DC)
Finish, weave end.

Count/skip 24 stitches around front of hat, join yarn to hat to begin second earflap. Repeat earflap pattern from above.


Finish Edge & Curly-Cues:
Find the back of hat.
CC = Green
Ch 1, SC around to first earflap, sc along edge of earflap to tip.
Ch 40. 2 SC in second chain from hook, 2 SC in each chain back to tip of earflap.
SL ST to earflap, sc along edge of earflap down to hat.
SC around to second earflap, SC along edge of earflap to tip.
Ch 40. 2 SC in second chain from hook, 2 SC in each chain back to tip of earflap.
SL ST to earflap, sc along edge of earflap down to hat.
SC around to first sc, join.
Finish, weave ends. Or continue to optional leaf edge.


Leaf Edge:
CC = Green
You'll work in the SC's from the finished edge until you reach the first row of the earflaps. Then you'll slip stitch and chain your way across to the other side according to the instructions below, creating your base for the leaves to go right over the top of your earflaps. (Clear as mud right? See the image above as an example.)
Rnd 1: Ch 6, skip 4 spaces, sl st to next sc from previous row, [Ch 5, skip 4 spaces, sl st to next sc] repeat around, join to 1st ch of round.
Rnd 2: Ch 1, [sc, hdc, dc 3, ch2, dc 3, hdc, sc] in each ch 4 space around, join to 1st ch of round. (12 leaves)
Finish, weave ends


You are all done! If you have ANY questions about constructing this hat or find any errors in the pattern, please let me know in the comments, e-mail, or on Ravelry! Enjoy!

Rock the hook.
xx

Don't forget to rock with me over at Facebook, Pinterest and on Ravelry.

Wednesday, October 2, 2013

Pretty Baby Beanie


Hey Crochet Rockers! We’ve reached 450+ likes on FB, so I thought “hey – I’m gonna spread the crochet love to all these new friends!” Here’s my version of a simple baby beanie that is easy to crochet and works up in an evening (even for beginners). I hope you all like it. As always, should you have any questions about this pattern – please email me, message me on Ravelry or comment on this post.

This sweet baby beanie was a special order for a baby shower gift and I think it turned out to be so precious! (Shout out to Irma A. for the request and inspiration!)

I've also created a post for the Pretty Girl Beanie here (a larger version of this beanie). It has instructions for sizes 6 months - Adult.


Size: 0 – 3 months

Skill Level: Easy

Materials:
Caron Simply Soft yarn (any two colors)
Yarn/tapestry needle

Hook size: H/5.00mm

Key:
CH = chain
SC = single crochet
DC = double crochet
SL ST = slip stitch
JOIN = slip stitch to first st of round
MR = Magic Ring (tutorial here)
RND = round
CC = change color

Gauge:
5 DC = 1 inch
2 rows = 1 inch

Notes:
Start your first stitch of each round in the same space as your chain.
Join your round to the first DC, not your chain.
Chains do not count as stitches in this pattern.

Instructions: 
 
Newborn
Rnd 1: MR, chain 2, 10 dc, join.
Rnd 2: Ch 2, 2 dc in each st around, join. (20 DC)
Rnd 3: Ch 2, [2 dc in next stitch, dc 1] around, join. (30 DC)
Rnd 4: Ch 2, [2 dc in next stitch, dc 2] around, join. (40 DC)
Rnd 5: Ch 2, dc around, join. (40 DC)
Rnd 6 – 8: Repeat Rnd 5.

CC = alternate color (Mine is pink in the image.)
Rnd 9 – 12: Ch 1, SC around, join (40 SC)

CC = primary color (Mine is gray in the image.)
Ch 1, skip next st, 5 DC in next st, skip next st, [sl st in next, skip 1, 5 DC in next, skip 1] repeat around. SC in last sp, join
Finish, weave ends.

3 months
Rnd 1: MR, Chain 2, 10 DC, join.
Rnd 2: Ch 2, 2 DC in each around, join. (20 DC)
Rnd 3: Ch 2, [2 DC in first stitch, DC in next] around, join. (30 DC)
Rnd 4: Ch 2, [2 DC in first stitch, DC in next 2] around, join. (40 DC)
Rnd 5: Ch 2, [2 DC in first stitch, DC in next 3] around, join. (50 DC)
Rnd 6: Ch 2, DC around, join. (50 DC)
Rnd 7 – 8: Repeat Rnd 6.

CC = alternate color (Mine is pink in the image.)
Rnd 9 – 12: Ch 1, SC around, join (50 SC)

CC = primary color (Mine is gray in the image.)
Ch 1, skip next st, 5 DC in next st, skip next st, [sl st in next, skip 1, 5 DC in next, skip 1] repeat around. SC in last sp, join
Finish, weave ends.

6 months
Rnd 1: MR, chain 2, 10 dc, join.
Rnd 2: Ch 1, 2 dc in each st around, join. (20 DC)
Rnd 3: Ch 1, [2 dc in next stitch, dc 1] around, join. (30 DC)
Rnd 4: Ch 1, [2 dc in next stitch, dc 2] around, join. (40 DC)
Rnd 5: Ch 1, [2 dc in next stitch, dc 3] around, join. (50 DC)
Rnd 6: Ch 1, [2 dc in next stitch, dc 4] around, join. (60 DC)
Rnd 7: Ch 1, dc around, join. (60 DC)
Rnd 8 – 9: Repeat Rnd 7.


CC = alternate color (Mine is pink in the image.)
Rnd 10 – 13: Ch 1, SC around, join (60 SC)

CC = primary color (Mine is gray in the image.)
Ch 1, skip next st, 5 DC in next st, skip next st, [sl st in next, skip 1, 5 DC in next, skip 1] repeat around. SC in last sp, join
Finish, weave ends.


Optional Embellishment:
I crocheted two different styles of flowers that my friend could include with her baby shower gift. One flower was larger, more full and sassy, while the other was smaller, less full and more subdued. That way, mommy has options! (Some mommies like the larger flowers, some like a little “less.”)

Here are the links to the two free flower patterns I used.

You could also use buttons, silk flowers, fabric flowers, ribbons or other fun accents to adorn this sweet little beanie. Be creative!

Rock the hook.
xx

Don't forget to rock with me over at Facebook, Pinterest and on Ravelry.
Related Posts Plugin for WordPress, Blogger...

My Little Lion Crochet Set

I found these images in my archives and thought it would be fun to share. I never ended up writing or publishing the patterns. If I get some...