Crochet Rochelle: Home
Showing posts with label Home. Show all posts

Friday, June 5, 2020

Granny Square Lovey


This Granny Square Lovey pattern is simple, fun and quick to work up! The Granny Square Lovey can be adapted to just about any cozy size of afghan you could want.

I needed a quick baby gift and this was the perfect project to use some of my favorite Caron Cakes Self Striping Yarn! The nice thing about using the Caron Cakes Self Striping Yarn is the coloring affect it created without me having to change colors. Plus, one Caron Cakes skein produced the whole lovey. I added a white yarn border with picots to set off the bright colors of the self striping. It created a really nice contrast.

Add this pattern to your Ravelry Queue.

Size: Size shown is 36" x 36" (Pattern is easy to adjust to a larger size.)

Skill Level: Easy

Materials:
Baby, worsted or cotton yarn (Caron Cakes
Tapestry needle
Scissors

Hook size: K/6.50 mm
(Adjust your hook according to yarn weight.)

Abbreviations:
CH = chain
SC = single crochet
DC = double crochet
JOIN = sl st to first stitch of round
MR = Magic Ring (tutorial here)
RND = Round
SK = skip
SL ST = slip stitch
SP = space
Gauge:
6 dc = 2" across
3 rows = 2" height

Notes:
First three chains at beginning of each round count as first double crochet of the round in this pattern.
Slip stitch to the third chain at the beginning of each round to join.


Pattern:
Rnd 1: In MR, ch 3, 2 dc, ch 2, [3 dc, ch 2] 3 times. Sl st to beginning of rnd, sl st next 2 stitches, sl st in ch 2 space. (12 sts)
Rnd 2: In ch 2 space (ch 3, 2 dc, ch 2, 3 dc, ch 1). In next ch space (3 dc, ch 2, 3 dc), repeat around. 
Sl st to beginning of rnd, sl st next 2 stitches, sl st in ch 2 space. (24 sts)
Rnd 3: In ch 2 space (ch 3, 2 dc, ch 2, 3 dc, ch 1). *[In next ch space (3 dc, ch1). In next ch space (3 dc, ch 2, 3 dc)], repeat from * around. 
Sl st to beginning of rnd, sl st next 2 stitches, sl st in ch 2 space. (36 sts)
Rnd 4 - 22: For remaining rounds of granny square lovey, continue pattern in the same manner. Work (ch 3, 2 dc, ch 2, 3 dc, ch 1) in each corner and [In next ch space (3 dc, ch1)] across to each corner.

A Granny Square Lovey I crocheted, changing colors every four rows.

Optional Border:
*To form picot: ch 3, sl st to 1st ch
Join yarn. Ch 1, (1 sc, picot, 1 sc,) in corner, *(sc 5, picot), repeat from * to next corner, (1 sc, picot, 1 sc,) in corner. Repeat this pattern around entire edge of project.
I like to place a picot in each corner so I mess around with my single crochet count until it all fits together. I used to be a perfectionist about stitch count but when my washcloth is finished I won't notice.
Finish, weave ends.


If you try this pattern, I’d love to see your finished product! Sharing is caring.

#rockthehook
Tia

Connect with me here:

COPYRIGHT: This pattern and associated images are protected by copyright for © 2012-2020 Crochet Rochelle and may not be duplicated or sold. PLEASE DO NOT COPY, SHARE, ADJUST OR RESELL PATTERN. This pattern may be printed for the personal use of the purchaser only, and may not in any form be reproduced or distributed, in part or in whole, through any venue, electronic or otherwise. You MAY sell finished PRODUCTS from this pattern and I would so appreciate a mention or link as the source of the pattern. Many hours of creating, design and love goes into each pattern. Please respect my efforts.

Friday, May 22, 2020

Granny Square Washcloth


The granny square is a simple and timeless crochet block of fabric that can be used in so many ways. Crochet granny squares to create blankets, scarves, bags and other beautiful projects. Below you will find instructions for creating the basic granny square that functions as a quick and easy washcloth pattern, perfect for you home or as a gift. 

Add this pattern to your Ravelry Queue.

Skill Level:  Easy

Materials:  
Cotton yarn
Yarn needle

Hook size: I/5.50mm

Abbreviations:
CH = chain
SC = single crochet
DC = double crochet
JOIN = slip stitch to join
MR = magic ring
RND = round
SL ST = slip stitch

Gauge: 
4 dc = 1" length
1 rows = 0.75" height


Pattern Instructions:
Magic Ring (Click for tutorial.)
Rnd 1: In MR, ch 3, 2 dc, ch 2, [3 dc, ch 2] 3 times. Sl st to beginning of rnd, sl st next 2 stitches, sl st in ch 2 space. (12 sts)
Rnd 2: In ch 2 space (ch 3, 2 dc, ch 2, 3 dc, ch 1). In next ch space (3 dc, ch 2, 3 dc), repeat around. 
Sl st to beginning of rnd, sl st next 2 stitches, sl st in ch 2 space. (24 sts)
Rnd 3: In ch 2 space (ch 3, 2 dc, ch 2, 3 dc, ch 1). *[In next ch space (3 dc, ch1). In next ch space (3 dc, ch 2, 3 dc)], repeat from * around. 
Sl st to beginning of rnd, sl st next 2 stitches, sl st in ch 2 space. (36 sts)
Rnd 4: In ch 2 space (ch 3, 2 dc, ch 2, 3 dc, ch 1). *[In next ch space (3 dc, ch1), repeat to corner space. In corner space (3 dc, ch 2, 3 dc)], repeat from * around. 
Sl st to beginning of rnd, sl st next 2 stitches, sl st in ch 2 space. (36 sts)
Rnd 5: In ch 2 space (ch 3, 2 dc, ch 2, 3 dc, ch 1). *[In next ch space (3 dc, ch1), repeat to corner space. In corner space (3 dc, ch 2, 3 dc)], repeat from * around. 
Sl st to beginning of rnd, sl st next 2 stitches, sl st in ch 2 space. (60 sts)
Rnd 6: In ch 2 space (ch 3, 2 dc, ch 2, 3 dc, ch 1). *[In next ch space (3 dc, ch1), repeat to corner space. In corner space (3 dc, ch 2, 3 dc)], repeat from * around. 
Sl st to beginning of rnd, sl st next 2 stitches, sl st in ch 2 space. (72 sts)
Rnd 7: [In ch 2 space (ch 1, 3 sc), sc across to next corner], repeat from * around. sl st to first sc to join. (72 sts).
Break yarn, weave ends.


Optional Border:
*To form picot: ch 3, sl st to 1st ch
Rnd 8: Join yarn. Ch 1, (1 sc, picot, 1 sc,) in corner, *(sc 5, picot), repeat from * to next corner, (1 sc, picot, 1 sc,) in corner. Repeat this pattern around entire edge of project.
I like to place a picot in each corner so I mess around with my single crochet count until it all fits together. I used to be a perfectionist about stitch count but when my washcloth is finished I won't notice.
Finish, weave ends.


If you try this pattern, I’d love to see your finished product! Sharing is caring.

#rockthehook
Tia

Connect with me here:

COPYRIGHT: This pattern and associated images are protected by copyright for © 2012-2020 Crochet Rochelle and may not be duplicated or sold. PLEASE DO NOT COPY, SHARE, ADJUST OR RESELL PATTERN. This pattern may be printed for the personal use of the purchaser only, and may not in any form be reproduced or distributed, in part or in whole, through any venue, electronic or otherwise. You MAY sell finished PRODUCTS from this pattern and I would so appreciate a mention or link as the source of the pattern. Many hours of creating, design and love goes into each pattern. Please respect my efforts.


Friday, May 8, 2020

Rumpelstiltskin Washcloth


The griddle stitch pattern creates a soft texture ideal for any fabric and occasion! 

*The griddle stitch is an alternating pattern between SC and DC. Make SC stitches in DC stitches from previous row, then DC in the SC from previous row. Each row should always start with a SC and end with a DC, Chain 1 and turn.

Add this pattern to your Ravelry Queue.

Materials: 
Cotton worsted weight yarn
Tapestry needle

Hook size: I/5.50 mm 

Abbreviations:
CH = chain
SC = single crochet
DC = double crochet
SL ST = slip stitch
ST = stitch
 
Gauge:
4 stitches = 1" across 
2 rows = 1" height 

Special Notes:
Chains do not count as stitches in this pattern.
End on DC stitch throughout pattern. 

Pattern Instructions:
Chain 21.
Row 1: SC in second chain from hook, DC in next chain, (SC, DC) repeat across to end of chains, Chain 1, turn. (20 sts)
Row 2: SC in first stitch, DC in next, (SC, DC) repeat across to end of row, Chain 1, turn. (20 sts) 
Row 3 - 16: Repeat R2. (20 sts)
Break yarn, weave ends.

Optional: 
Add a row of single crochet around four sides of washcloth. I used the following pattern for the washcloth pictured:

Join yarn to last stitch of Row 16, 3 sc in corner,
*[sc 5, ch 3 (picot), sc 5], repeat from * across to next corner, 3 sc in corner. Repeat this pattern around all four sides of washcloth. Join yarn to first sc in starting corner to finish. Break yarn, weave ends. 


If you try this pattern, I’d love to see your finished product! Sharing is caring.

#rockthehook
Tia

Connect with me here:

COPYRIGHT: This pattern and associated images are protected by copyright for © 2012-2020 Crochet Rochelle and may not be duplicated or sold. PLEASE DO NOT COPY, SHARE, ADJUST OR RESELL PATTERN. This pattern may be printed for the personal use of the purchaser only, and may not in any form be reproduced or distributed, in part or in whole, through any venue, electronic or otherwise. You MAY sell finished PRODUCTS from this pattern and I would so appreciate a mention or link as the source of the pattern. Many hours of creating, design and love goes into each pattern. Please respect my efforts.

Friday, May 1, 2020

Rumpelstiltskin Coffee Cozy

The griddle stitch pattern creates a soft texture ideal for any fabric and occasion! 

*The griddle stitch is an alternating pattern between SC and DC. Make SC stitches in DC stitches from previous row, then DC in the SC from previous row. Each row should always start with a SC and end with a DC, Chain 1 and turn.


Materials: 
Worsted weight yarn
Tapestry needle

Hook size: I/5.50 mm 

Abbreviations:
CH = chain
SC = single crochet
DC = double crochet
SL ST = slip stitch
ST = stitch
 
Gauge:
4 stitches = 1" across 
2 rows = 1" height 

Special Notes:
Chains do not count as stitches in this pattern.
End on DC stitch throughout pattern. 

Pattern Instructions:
Chain 35.
Row 1: SC in second chain from hook, DC in next chain, *(SC, DC) repeat across to end of chains, Chain 1, turn. (34 sts)
Row 2: SC in first stitch, DC in next, *(SC, DC) repeat across to end of row, Chain 1, turn. (34 sts) 
Row 3 - 8: Repeat R2. (34 sts)
Break yarn, weave ends.

Assembly: 
Add buttons to one edge. Use spaces/gaps in rows on opposite end to fasten buttons and wrap coffee cozy around a coffee cup or mug.

Display or gift on a cute cardboard coffee cup. You can find a free template for the cardboard coffee cup here. 


If you try this pattern, I’d love to see your finished product! Sharing is caring.

#rockthehook
Tia

Connect with me here:

COPYRIGHT: This pattern and associated images are protected by copyright for © 2012-2020 Crochet Rochelle and may not be duplicated or sold. PLEASE DO NOT COPY, SHARE, ADJUST OR RESELL PATTERN. This pattern may be printed for the personal use of the purchaser only, and may not in any form be reproduced or distributed, in part or in whole, through any venue, electronic or otherwise. You MAY sell finished PRODUCTS from this pattern and I would so appreciate a mention or link as the source of the pattern. Many hours of creating, design and love goes into each pattern. 
Please respect my efforts.


Friday, April 24, 2020

Rumpelstiltskin Mug Rug Coaster


The griddle stitch pattern creates a soft texture ideal for any fabric and occasion! 

*The griddle stitch is an alternating pattern between SC and DC. Make SC stitches in DC stitches from previous row, then DC in the SC from previous row. Each row should always start with a SC and end with a DC, Chain 1 and turn.


Materials: 
Worsted weight yarn
Tapestry needle

Hook size: I/5.50mm 

Abbreviations:
CH = chain
SC = single crochet
DC = double crochet
SL ST = slip stitch
ST = stitch
 
Gauge:
4 stitches = 1" across 
2 rows = 1" height 

Special Notes:
Chains do not count as stitches in this pattern.
End on DC stitch throughout pattern. 

Pattern Instructions:
Chain 13.
Row 1: SC in second chain from hook, DC in next chain, *(SC, DC) repeat across to end of chains, Chain 1, turn. (12 sts)
Row 2: SC in first stitch, DC in next, *(SC,DC) repeat across to end of row, Chain 1, turn. (12 sts) 
Row 3 - 10: Repeat R2. (12 sts)
Break yarn, weave ends.


Assembly: 
You should now have a square shaped piece of fabric. Cut 6" lengths of yarn (12 per side). Create little tassels to run along the edge of the opposite sides of your mug rug. I paired two pieces together and spaced 6 tassels along each side. (See image for reference.) I pulled the middle of both pieces through a gap in the last row, then fed the tails through the small loop. Pull tight and you have a cute little tassel! 

*Alternate option: No tassels and a single crochet border around the entire piece. Or, more tassels as desired.  


If you try this pattern, I’d love to see your finished product! Sharing is caring.

#rockthehook
Tia

Connect with me here:

COPYRIGHT: This pattern and associated images are protected by copyright for © 2012-2020 Crochet Rochelle and may not be duplicated or sold. PLEASE DO NOT COPY, SHARE, ADJUST OR RESELL PATTERN. This pattern may be printed for the personal use of the purchaser only, and may not in any form be reproduced or distributed, in part or in whole, through any venue, electronic or otherwise. You MAY sell finished PRODUCTS from this pattern and I would so appreciate a mention or link as the source of the pattern. Many hours of creating, design and love goes into each pattern. 
Please respect my efforts.

Wednesday, December 17, 2014

Coffee Cozy


(This pattern originally appeared online at Craftown.com. Copyrights have now reverted to me, the designer.)

Got mocha? Perfect for personalizing your "cup of joe" - this cute coffee cozy adds a little flair to your drink! Create a quirky coffee cozy with my free crochet pattern for yourself, a friend or as a quick gift. This project is simple and easy and great for beginners or anyone wanting a relaxing crochet project. Make some in a variety of colors and color combinations to really personalize your coffee cozy creations. This simple cozy would make a nice teacher gift too, paired with a coffee gift card of course!

*Note: This coffee cozy was made to fit a 16 oz. cup but could be easily adapted to fit larger or smaller cups.

Add this pattern to your Ravelry Queue.

Skill Level:  Easy

Materials: Red Heart Worsted Weight Yarn in "Mexicana", large button, yarn needle

Hook size: I/5.50mm

Abbreviations:
CC = change color
CH = chain
SC = single crochet
SL ST = slip stitch
SC2TOG = single crochet decrease (or single crochet 2 together)

Gauge: 4 sc = 1 inch

Instructions:

Chain 31.
Row 1: Sc 30, ch 1, turn.
Row 2: Sc 10, 2 sc in next space, sc 10, 2 sc in next space, sc 8, ch 1, turn.
Row 3: Sc across row, ch 1, turn. (32 sc’s)
Row 4: Sc 10, 2 sc in next space, sc 10, 2 sc in next space, sc 10, ch 1, turn.
Row 5: Sc across row, ch 1, turn. (34 sc’s)
*Button closure: Ch 8, sl st to first ch. Proceed to Row 6.
Row 6: Sc 10, 2 sc in next space, sc 10, 2 sc in next space, sc 10, 2 sc in next space, sc 1, ch 1, turn.
Row 7: Sc across row, ch 1, turn. (37 sc’s)
Row 8: Sc 10, 2 sc in next space, sc 10, 2 sc in next space, sc 10, 2 sc in next space, sc 4, ch 1, turn.
Row 9: Sc across row, ch 1, turn. (40 sc’s)
Row 10: Sc 10, 2 sc in next space, sc 10, 2 sc in next space, sc 10, 2 sc in next space, sc 7.
Finish, weave ends in.


Bring It Together:
Using yarn and a yarn needle, sew the button onto the coffee cozy, approximately 2 inches in from edge on opposite side of button closure loop. This will make your coffee cozy fit snuggly on an average sized cardboard or Styrofoam 16 oz. coffee cup. (See image.)


Extras: The yarn I used tended to curl up so you may want to block this project when finished and before giving as a gift. Or use my shortcut: I saved a 16 oz. disposable coffee cup and used it as my form for the finished cozy. I put the cozy on the cup for a few days and that took out the kinks in the project, as the cup keeps the cozy on tight. Enjoy using or giving your finished coffee cozy!

Rock the hook,
Tia

Don't forget to rock with me over at Facebook, Pinterest and on Ravelry.

Originally published at http://www.craftown.com/Coffee-Cozy.html

Wednesday, November 19, 2014

Water Bottle Cozy


(This pattern originally appeared online at Craftown.com. Copyrights have now reverted to me, the designer.)  
 
Getting ready for a workout or your favorite sport? Create your very own water bottle cozy to help you enjoy any sport or activity any time. Crochet a cozy to take on the go: while shopping, on vacation, playing your favorite sport, or any occasion.

Staying hydrated doesn’t get much cuter than a personalized water bottle cozy! Create one in any color with our free pattern. Enjoy your H2O in style! These also make fast and fun gifts or stocking stuffers!

Add this pattern to your Ravelry Queue.

Skill Level:  Easy

Materials: Red Heart Super Saver in “Earth & Sky”

Hook size: I/5.50mm

Abbreviations:
CH = chain
SC = single crochet
DC = double crochet
MR = magic ring (tutorial here)
SP = space (stitch from previous round)
SL ST = slip stitch

Gauge: 4 dc = 1 inch

Instructions: (Make two.)

Start with a magic ring. (YouTube Magic Ring Tutorial)
Rnd 1: Ch 3 (counts as first dc), dc 11, sl st to first st. (12 dc)
Rnd 2: Ch 3, dc in same sp, 2 dc in each sp around to end, sl st to first st. (24 dc)
Rnd 3: Ch 3, dc in each sp around, sl st to first st. (24 dc)
Rnd 4 – 12: Repeat Rnd 3. (24 dc)
Carry Loop: Ch 15, sl st to first dc of Rnd 12. (See image.)
Finish, weave in ends.


*Note: This crochet pattern will fit most 16 – 24 oz sized water bottles. (I used a Nestle brand 16.9 oz water bottle for my pattern.)

Rock the hook,
Tia

Don't forget to rock with me over at Facebook, Pinterest and on Ravelry.

Originally published at http://www.craftown.com/Water-Bottle-Cozy.html

Wednesday, November 5, 2014

Survival Keychain


(This pattern originally appeared online at Craftown.com. Copyrights have now reverted to me, the designer.)  
 
Survival bracelets and key chains are very trendy with the outdoor crowd, not only as must-have survival gear, but also as accent pieces. I wanted to create a crocheted keychain for stocking stuffers using para cord to double as a survival tool as well, for all the guys at Christmas time. I give credit to Planet June for my I-cord inspiration and pattern source.

I adapted her tutorial to serve as the basis for my survival keychain.  Visit her YouTube Tutorial if you get stuck or just need an extra example of how the keychain should look. I hope you enjoy creating and giving your special guy a crocheted survival keychain!

Add this pattern to your Ravelry Queue.

Skill Level:  Easy

Materials: Para cord (any color), Key Ring (any size)

Hook size: N/9.00mm

Abbreviations:
CH = chain
SC = single crochet
SL ST = slip stitch

Gauge: not needed

Instructions:
Leave about 6” of Para cord for finishing. 
CH 3.
keychain keychain
Row 1: In second chain from hook, pull up a loop on the hook. (You now have 2 loops on your hook.) In third chain from hook, pull up a loop on the hook. (You should now have 3 loops on your hook.)
Row 2: Carefully remove 2 loops from hook, leaving them pulled up through chains. I like to hold my two loops so as not to accidentally pull them back out. With 1st loop on the hook, ch 1. Pick up 2nd loop onto hook, ch 1. Pick up 3rd loop onto hook, ch1. You should now have 3 loops on your hook again.
keychain keychain 
Row 3: Remove 2 loops from hook, leaving them pulled up through chains. With 1st loop on hook, ch 1. Pick up 2nd loop onto hook, ch1. Pick up 3rd loop onto hook, ch1. Again, you should have 3 loops on your hook.
keychain keychain
Repeat Row 3 until you have approximately 6 inches of I-cord pattern or until you have your desired length.  (I ended with 15  rows = 6 inches of I-cord.) The I-cord should begin to curve a bit as you add length, forming a “cord” shape.
keychain 
Finish by chaining 1 through all 3 loops on hook. Ch1 again. Tie a nice tight knot or weave in ends.
Note: I burn or singe the ends of my para cord to keep it from unraveling.
To use, slide end loops onto a key ring (I used a 2 inch key ring).
Extra Info:
6” of I-cord  = approx. 9’ of para cord
8” of I-cord = approx. 12’ of para cord
Para cord can be found at some Army surplus stores, Outdoor Recreation/Camping Gear stores, craft stores and many places online. My local Army surplus and Outdoor Gear stores mostly carry black or dark green colors. However, I have purchased some fun colors from online sources at very reasonable prices, (usually in bulk for the best price per foot.) I even spotted some in smaller quantities at Michael's last week. Try crocheting some in team colors, neon colors, and my personal favorite: pink!


Rock the hook,
Tia

Don't forget to rock with me over at Facebook, Pinterest and on Ravelry.

Originally published at http://www.craftown.com/Survival-Keychain.html

Friday, May 23, 2014

American Soda Cozy Pattern


Hey Rockers!

A couple of years ago, when I first started creating my own patterns, I came up with a simple soda can cozy in a "Captain America" theme for my brother's birthday. His wife was throwing him an Avengers birthday party so I thought matching soda cozies would be awesome. That's just the kind of sister I am!

(Yes, he is an adult. But really, who doesn't like Captain America and the Avengers?)

Looking back over my soda cozies, I thought this pattern would also be fitting for a Memorial Day picnic or Independence Day barbeque, or any patriotic themed event. Not from the USA? No problem. Just choose colors from your home country's flag and celebrate your way.

This soda cozy fits all standard size soda and beer cans. It also fits most glass beer bottles too. Nice!

Add this pattern to your Ravelry Queue.

Skill Level: Easy

Supplies:
Lion Brand Vanna’s Choice in Red, White, & Blue
yarn needle

Hook: size H/5.00mm

Key:
CH = chain
SC = single crochet
HDC = half double crochet
DC = double crochet
SL ST = slip stitch

Gauge:
4 hdc = 1" length

Instructions:
Since I originally published the pattern at Craftown, you'll have to get the pattern instructions to make this festive soda cozy over there!


Enjoy your weekend, holiday and Memorial Day - wherever you may be!

Rock the hook, 
Tia

Don't forget to rock with me over at Facebook, Pinterest and on Ravelry.

Thursday, May 1, 2014

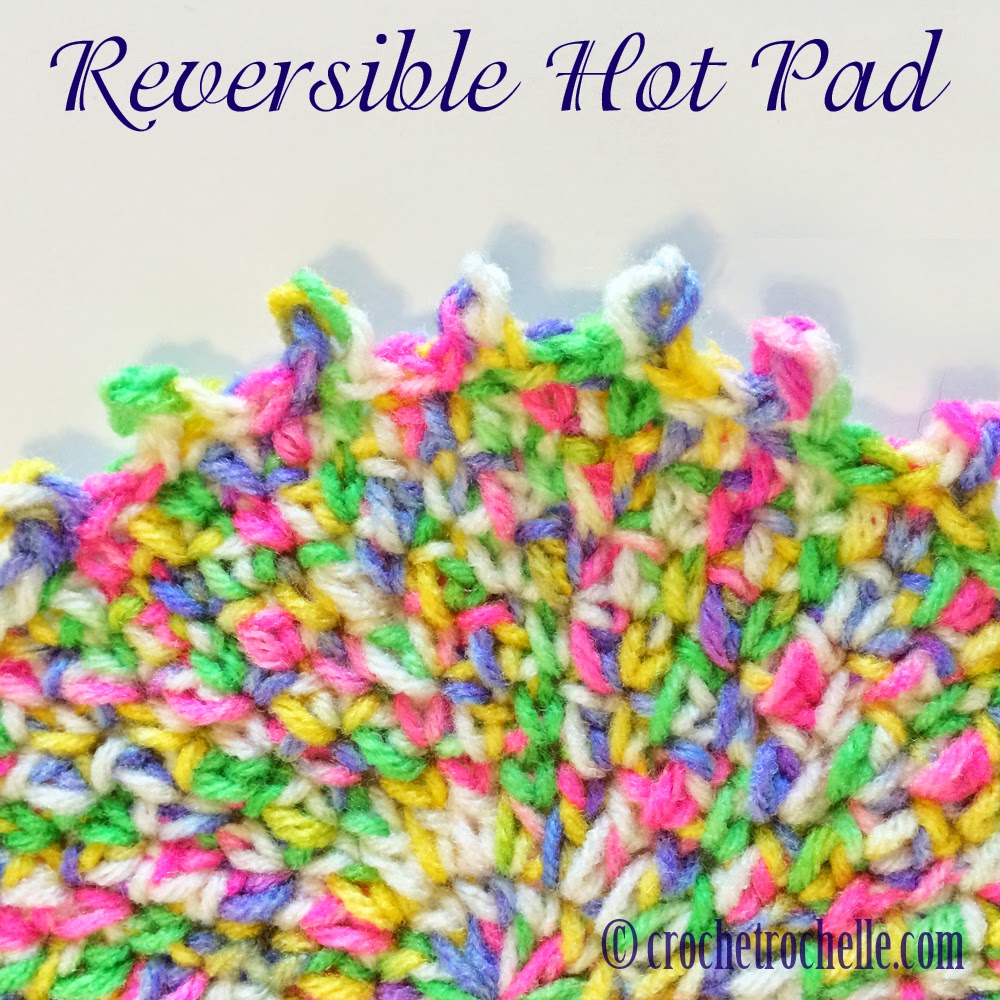
Reversible Hot Pad Pattern


Hey Rockers,

Looking for something simple to crochet for the kitchen – either for Mother’s Day or as a quick gift you can work up easy-peasy? I’ve come up with a VERY simple hot pad to add some texture and color to your kitchen. Use worsted yarn for crocheting one or two (or several) hot pads. Substitute in cotton yarn to use as pot scrubbers or dish cloths. See how fun that is? Double duty!

Turn the hot pad over to the “wrong” side of your work for a slightly different (but still very cute) texture, or use the cotton version’s “wrong” side to scrub those dishes! Or just sit and admire your pretty little round creation. Enjoy!


Add this pattern to your Ravelry Queue.

Skill Level: Easy

Materials:
Worsted yarn or cotton yarn
Yarn/tapestry needle

Hook size: I/5.50mm

Key:
CH = chain
SC = single crochet
DC = double crochet
JOIN = sl st to first dc of round
MR = magic ring (tutorial here)
PICOT = ch 3, sl st to first ch
RND = Round
SL ST = slip stitch

Gauge:
4 DC = 1" (length)
2 Rows of DC = 1" (height)


Notes:
Start your first stitch of each round in the same space as your chain.
Join your round to the first DC, not your chain.
Chains do not count as stitches in this pattern.


Instructions:
Rnd 1: Magic Ring, 12 dc, join. (12)
Rnd 2: Ch 2, [2dc in each stitch] around, join. (24)
Rnd 3: Ch 1, [(sc,dc) in next stitch, sc, dc] around, join. (32)
Rnd 4: Ch 1, [(sc,dc) in next stitch, sc, dc] around, sc, dc, join. (42)
Rnd 6: Ch 1, [(sc,dc) in next stitch, sc, dc] around, join. (56)
Rnd 6: Ch 1, [(sc,dc) in next stitch, sc, dc, sc, dc] around, (sc,dc) in last stitch, join. (68)
Rnd 7: Ch 1, [(sc,dc) in next stitch, sc, dc, sc, dc, sc, dc] repeat 8x, (sc,dc) in next stitch, sc, dc, sc, dc, join. (78)
Rnd 8: Ch 15, sl st to 1st ch to form loop; [sl st 3, picot] around, join to 1st chain of loop.
Break yarn, weave ends.

You are all done!


XX,

Tia

Don't forget to rock with me over at Facebook, Pinterest and on Ravelry.

Wednesday, March 26, 2014

Spring Granny Dishcloth

 
(This pattern originally appeared online at Craftown.com. Copyrights have now reverted to me, the designer.)  
 
The sun is bright and birds are chirping, which reminds me that Spring cleaning is right around the corner…or just after I finish up another crochet project! Now is the perfect time to make yourself some Spring Granny dishcloths using our free crochet pattern. Crochet a pretty dishcloth based on the solid granny square motif to use in the kitchen, for cleaning or share with a friend as a lovely homemade gift.

Create several crocheted dishcloths in colors to match or contrast with your kitchen décor. Lily Sugar’n Cream has all sorts of new colors out and many in a nice variegated color scheme too. I was able to make two dishcloths from 1 skein of Lily Sugar’n Cream, but any cotton yarn will do the trick. I changed color before Round 6 to add a distinct border, but you could simply continue to Round 6 without changing color if you prefer. Enjoy crocheting this pattern and your Spring cleaning!

Add this pattern to your Ravelry Queue.

Skill Level:  Easy
Materials:  Cotton yarn, (I used Lily Sugar’n Cream.)

Hook size: I/5.50mm

Abbreviations:
CC = change color
CH = chain
SC = single crochet
DC = double crochet
JOIN = slip stitch to join
MR = magic ring
RND = round
SL ST = slip stitch

Gauge: 4 dc = 1 inch


Instructions:
Magic Ring (Click for tutorial.)
Rnd 1: Ch 3, 2 dc in ring, *ch 2, 3 dc, repeat twice from *, join with sl st to 1st dc (ch 3 from beginning of round and throughout pattern). (12 sts)
Rnd 2: Ch 3, 2 dc, [2dc, ch 2, 2dc] in ch 2 sp, *3 dc, [2 dc, ch 2, 2dc] in ch 2 sp, repeat twice from *, join with sl st to 1st dc (ch 3). (28 sts)
Rnd 3: Ch 3, 4 dc, [2dc, ch 2, 2dc] in ch 2 sp, *7 dc, [2dc, ch 2, 2dc] in ch 2 sp, repeat twice from *, 2 dc, join with sl st to 1st dc (ch 3). (44 dc)
Rnd 4: Ch 3, 6 dc, [2dc, ch 2, 2dc] in ch 2 sp, *11 dc, [2dc, ch 2, 2dc] in ch 2 sp, repeat twice from *, 4 dc, join with sl st to 1st dc (ch 3). (60 dc)
Rnd 5: Ch 3, 8 dc, [2dc, ch 2, 2dc] in ch 2 sp, *15 dc, [2dc, ch 2, 2dc] in ch 2 sp, repeat twice from *, 6 dc, join with sl st to 1st dc (ch 3). (76 dc)

CC
Rnd 6: Ch 3, 10 dc, [2dc, ch 2, 2dc] in ch 2 sp, *19 dc, [2dc, ch 2, 2dc] in ch 2 sp, repeat twice from *, 8 dc, join with sl st to 1st dc (ch 3). (92 dc)
Finish, weave ends. Or continue to optional finish round.


Optional Finish Round with Picot
*To form picot: ch 3, sl st to 1st ch
Rnd 7: Ch 1, 1 sc, picot, *3 sc, picot, repeat twice from *, 1 sc, [2 sc, picot, 2 sc] in ch 2 sp. *(3 sc, picot) 6 times, 1 sc, [2 sc, picot, 2 sc] in ch 2 sp, repeat twice from *. (This takes you completely around 3 sides of the dishcloth and back to the first side.) 1 sc, picot, *3 sc, picot, repeat twice from *, 2 sc, join to first sc of round with sl st.
Finish, weave ends.

Rock the hook,
Tia

Don't forget to rock with me over at Facebook, Pinterest and on Ravelry.

Originally published at http://www.craftown.com/Granny-Dishcloth.html
Related Posts Plugin for WordPress, Blogger...

My Little Lion Crochet Set

I found these images in my archives and thought it would be fun to share. I never ended up writing or publishing the patterns. If I get some...