Pages

Wednesday, November 26, 2014

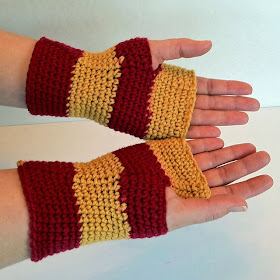
Gryffindor Hand Warmers


(This pattern originally appeared online at Craftown.com. Copyrights have now reverted to me, the designer.)

Do you have a Hogwarts fan that could use some warm hands? How about a Harry Potter buff needing relief from the chilly fall weather? I have just the thing to keep those hands warm and spirits high. Crochet a pair of Gryffindor Hand Warmers to show off your house pride and support your favorite Quidditch team. My free crochet pattern is simple and easy to work up and comes together in a nice tight pair of hand warmers. I designed this pattern to fit an adult hand, size medium to large. (They do fit my husband’s very large hands, although they are very tight on him.)

I had so much fun creating these hand warmers because first, I love Harry Potter, Hogwarts and wish I was a Gryffindor House member. And second, I loved how the bold red and gold stripes naturally formed from the Red Heart Team Spirit Yarn. You could easily use this pattern and Red Heart's other Team Spirit color variations to crochet a pair in your favorite sport team's colors.

Add this pattern to your Ravelry Queue.

Skill Level:  Easy

Materials: Red Heart Team Spirit Yarn in Red & Gold

Hook size: H/5.00mm

Abbreviations:
CC = change color
CH = chain
SC = single crochet
HDC = half double crochet
DC = double crochet
SL ST = slip stitch
SC2TOG = single crochet decrease (or single crochet 2 together)

Gauge: 5 sc = 1 inch


Instructions:
Ch 29, sl st to 1st ch to form a circle, being careful not to twist your chain.
Rnd 1: Ch 1, (always start in same st at join here and throughout pattern) sc in same sp, sc around, sl st to join. (28 sc)
Rnd 2 – 8: Repeat Rnd 1 (28 sc)

Left Hand:
Rnd 9: Ch 1, sc in same sp, sc 25, ch 8 skip 4 spaces, sl st to join. (34 st)
Rnd 10: Ch 1, sc in same sp, sc 33 around (including scs in chs from previous rnd), sl st to join. (34 sc)
Rnd 11 – 13: Ch 1, sc in same sp, sc 33 around, sl st to join. (34 sc)
Rnd 14: Ch 1, sc2tog, sc 24 around, sc2tog, sc 6, sl st to join. (32 sc)
Rnd 15: Ch 1, sc2tog, sc 24 around, sc2tog, sc 4, sl st to join. (30 sc)
Rnd 16: Ch 1, sc2tog, sc 22 around, sc2tog, sc 4, sl st to join. (28 sc)
Rnd 17: Ch 1, sc around, sl st to join. (28 sc)
Rnd 18 – 22: Repeat Rnd 17. (28 sc)
Rnd 23: Ch 1, 2 sc in same sp, sc 10, 2 sc in same sp, sc 10, 2 sc in same sp, sc 5, sl st to join. (31 sc)
Rnd 24: Ch 1, 2 sc in same sp, sc around to end, sl st to join. (32 sc)
Rnd 25: Ch 1, sc around, sl st to join. (32 sc)
Rnd 26 – 29: Repeat Rnd 25. At Rnd 29, finish and weave ends. (32 sc)

Right Hand:
Rnd 9: Ch 10, skip 4 spaces, sc 26, sl st to 2nd ch to join. (34 st)
Rnd 10: Ch 1, sc in same sp, sc 33 around, sl st to join. (34 sc) *Be sure to count your scs carefully here. I found it easy to start in the wrong sp at the beginning of rnd, causing me to have 35 scs.
Rnd 11 – 13: Ch 1, sc in same sp, sc 33 around, sl st to join. (34 sc)
Rnd 14: Ch 1, sc2tog, sc 6, sc2tog, sc 24 around, sl st to join. (32 sc)
Rnd 15: Ch 1, sc2tog, sc 4, sc2tog, sc 24 around, sl st to join. (30 sc)
Rnd 16: Ch 1, sc2tog, sc 4, sc2tog, sc 22 around, sl st to join. (28 sc)
Rnd 17: Ch 1, sc 28 around, sl st to join. (28 sc)
Rnd 18 – 22: Repeat Rnd 17. (28 sc)
Rnd 23: Ch 1, 2 sc in same sp, sc 10, 2 sc in same sp, sc 10, 2 sc in same sp, sc 5, sl st to join. (31 sc)
Rnd 24: Ch 1, 2 sc in same sp, sc around to end, sl st to join. (32 sc)
Rnd 25: Ch 1, sc around, sl st to join. (32 sc)
Rnd 26 – 29: Repeat Rnd 25. At Rnd 29, finish and weave ends. (32 sc)

You are all done! Enjoy.


Rock the hook,
Tia

Don't forget to rock with me over at Facebook, Pinterest and on Ravelry.

Originally published at http://www.craftown.com/Gryffindor-Hand-Warmers.html

Wednesday, November 19, 2014

Water Bottle Cozy


(This pattern originally appeared online at Craftown.com. Copyrights have now reverted to me, the designer.)  
 
Getting ready for a workout or your favorite sport? Create your very own water bottle cozy to help you enjoy any sport or activity any time. Crochet a cozy to take on the go: while shopping, on vacation, playing your favorite sport, or any occasion.

Staying hydrated doesn’t get much cuter than a personalized water bottle cozy! Create one in any color with our free pattern. Enjoy your H2O in style! These also make fast and fun gifts or stocking stuffers!

Add this pattern to your Ravelry Queue.

Skill Level:  Easy

Materials: Red Heart Super Saver in “Earth & Sky”

Hook size: I/5.50mm

Abbreviations:
CH = chain
SC = single crochet
DC = double crochet
MR = magic ring (tutorial here)
SP = space (stitch from previous round)
SL ST = slip stitch

Gauge: 4 dc = 1 inch

Instructions: (Make two.)

Start with a magic ring. (YouTube Magic Ring Tutorial)
Rnd 1: Ch 3 (counts as first dc), dc 11, sl st to first st. (12 dc)
Rnd 2: Ch 3, dc in same sp, 2 dc in each sp around to end, sl st to first st. (24 dc)
Rnd 3: Ch 3, dc in each sp around, sl st to first st. (24 dc)
Rnd 4 – 12: Repeat Rnd 3. (24 dc)
Carry Loop: Ch 15, sl st to first dc of Rnd 12. (See image.)
Finish, weave in ends.


*Note: This crochet pattern will fit most 16 – 24 oz sized water bottles. (I used a Nestle brand 16.9 oz water bottle for my pattern.)

Rock the hook,
Tia

Don't forget to rock with me over at Facebook, Pinterest and on Ravelry.

Originally published at http://www.craftown.com/Water-Bottle-Cozy.html

Wednesday, November 12, 2014

Circle Motif Earrings


(This pattern originally appeared online at Craftown.com. Copyrights have now reverted to me, the designer.)  
 
Crocheted jewelry always add a little bit of bohemian style to any outfit. Create your very own pair of crocheted earrings to coordinate with your outfit or crochet several pairs in different colors and color combinations to enjoy all year! These fun homemade earrings would also make a nice thank you or appreciation gift for someone special.


Add this pattern to your Ravelry Queue.

Skill Level:  Easy

Materials: Aunt Lydia’s Classic Size 10 Thread – any color, fish hook style earrings, needle

Hook size: 4/2.00MM

Abbreviations:
CH = chain
SC = single crochet
DC = double crochet
MR = magic ring (tutorial here)
SL ST = slip stitch

Gauge: not needed

Instructions: (Make two.)

Start with a Magic Ring.
Rnd 1: Ch 3 (counts as first dc), dc 11 in ring, sl st to join. (12 dc.)
Rnd 2: Ch 1, 2 sc in each sp around. sl st to join. (24 sc.)
Rnd 3: Ch 5, *skip 1 sp, 2 dc in next sp, ch 2, repeat from * around to end until you reach beginning ch. Dc in same space as beginning ch 5, sl st to 3rd ch to finish round, sl st to join. (52 st.)
Rnd 4: Ch 1, *2 sc in ch 2 space, sc 2, repeat from * around to end, sl st to join. (52 sc.)
Finish, leave about 8 – 10 inch tail to use to fasten motif to earring.


Rock the hook,
Tia

Don't forget to rock with me over at Facebook, Pinterest and on Ravelry.

Originally published at http://www.craftown.com/Crochet-Earrings2.html

Wednesday, November 5, 2014

Survival Keychain


(This pattern originally appeared online at Craftown.com. Copyrights have now reverted to me, the designer.)  
 
Survival bracelets and key chains are very trendy with the outdoor crowd, not only as must-have survival gear, but also as accent pieces. I wanted to create a crocheted keychain for stocking stuffers using para cord to double as a survival tool as well, for all the guys at Christmas time. I give credit to Planet June for my I-cord inspiration and pattern source.

I adapted her tutorial to serve as the basis for my survival keychain.  Visit her YouTube Tutorial if you get stuck or just need an extra example of how the keychain should look. I hope you enjoy creating and giving your special guy a crocheted survival keychain!

Add this pattern to your Ravelry Queue.

Skill Level:  Easy

Materials: Para cord (any color), Key Ring (any size)

Hook size: N/9.00mm

Abbreviations:
CH = chain
SC = single crochet
SL ST = slip stitch

Gauge: not needed

Instructions:
Leave about 6” of Para cord for finishing. 
CH 3.
keychain keychain
Row 1: In second chain from hook, pull up a loop on the hook. (You now have 2 loops on your hook.) In third chain from hook, pull up a loop on the hook. (You should now have 3 loops on your hook.)
Row 2: Carefully remove 2 loops from hook, leaving them pulled up through chains. I like to hold my two loops so as not to accidentally pull them back out. With 1st loop on the hook, ch 1. Pick up 2nd loop onto hook, ch 1. Pick up 3rd loop onto hook, ch1. You should now have 3 loops on your hook again.
keychain keychain 
Row 3: Remove 2 loops from hook, leaving them pulled up through chains. With 1st loop on hook, ch 1. Pick up 2nd loop onto hook, ch1. Pick up 3rd loop onto hook, ch1. Again, you should have 3 loops on your hook.
keychain keychain
Repeat Row 3 until you have approximately 6 inches of I-cord pattern or until you have your desired length.  (I ended with 15  rows = 6 inches of I-cord.) The I-cord should begin to curve a bit as you add length, forming a “cord” shape.
keychain 
Finish by chaining 1 through all 3 loops on hook. Ch1 again. Tie a nice tight knot or weave in ends.
Note: I burn or singe the ends of my para cord to keep it from unraveling.
To use, slide end loops onto a key ring (I used a 2 inch key ring).
Extra Info:
6” of I-cord  = approx. 9’ of para cord
8” of I-cord = approx. 12’ of para cord
Para cord can be found at some Army surplus stores, Outdoor Recreation/Camping Gear stores, craft stores and many places online. My local Army surplus and Outdoor Gear stores mostly carry black or dark green colors. However, I have purchased some fun colors from online sources at very reasonable prices, (usually in bulk for the best price per foot.) I even spotted some in smaller quantities at Michael's last week. Try crocheting some in team colors, neon colors, and my personal favorite: pink!


Rock the hook,
Tia

Don't forget to rock with me over at Facebook, Pinterest and on Ravelry.

Originally published at http://www.craftown.com/Survival-Keychain.html